Your Complete Guide for Measuring & Installing
-
Measuring for your Sport Screens
Use this guide to measure your fence area before ordering your Fence Screens
- It is very important to take accurate measurements and to always make sure that the measuring tape is taught so there’s not any slack. If it’s a long distance and you are getting a lot of slack in the measuring tape, run the tape along the ground. Slack is more likely to occur if the tape is run along the fence.
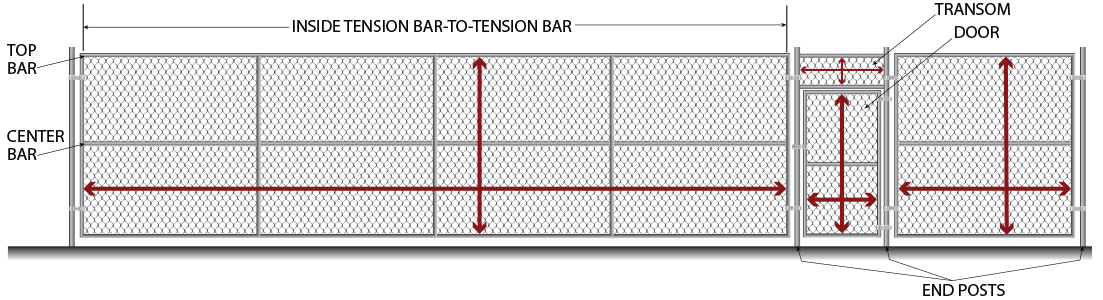
- Measure all fences inside of tension bar to inside of tension bar. Do not include end posts in the measurement, as windscreens should only cover the fence mesh. See the fence illustration for more details on how to measure.
- When measuring for the height of your screen; a standard tennis fence is 10 ft high – we make the screens 9 ft high leaving a small gap at the bottom of the fence. For other fences, you typically want to make the screens about 4 inches shorter than the fence height. This allows for weed eating/mowing without damaging your screens.
- Measurement for any doors and transoms should be done the same way as other panels.
- At any corners, fence breaks, or door areas; measurement should be ended, and a new measurement should begin.
- Measure every area to be safe. Do not assume two fence panels are the same size.
-
Additional Measuring and Ordering Tips
- Always measure at the install site rather than going off original drawings or blueprints.
- Make note of each measurement as you progress across the fence. To avoid miscalculations do not take multiple measurements before writing them down.
- It’s helpful to create a sketch along with your measurements. If you create a sketch, send it in with your custom panel dimensions and be sure to keep your notes for when you install the fence screening. This will serve as an installation map to follow.
- Provide us with your exact measurements of all areas in feet and inches.
- For each area, always round down to the nearest inch; no partial inches.
- When ordering, divide up long panel areas into lengths that are 60 feet or shorter. This allows for easier handling and installation of the screen panels.
- Air vents are recommended on all panels that are over 6 foot high and also in areas with high winds. Air vents are spaced every 10 foot on center.
- For installation, we recommend using 120 lb. UV protected tie wraps. There should be one tie rap securing every grommet. Alternatively, you may choose to secure some areas of the screens with 50 lb. tie raps or black lacing cord.
- To calculate an approximate amount of tie wraps that you will need to order you will need to take each panel of fence screen that is on your list and add the Top + Bottom + Side + Side all in feet increments. Since grommets are placed every 18 inches on the top and bottom and 12 inches on the sides this number will amount to an approximate number of ties that you will need with some extra. Tie wraps are sold in packages of 100 quantity.
- Example: 2 quantity, 6 ft H x 50 ft L sections: 2 x (6 + 6 + 50 + 50) = 224 Tie wraps needed.
- If your screen is over 6 ft in height and will have a center reinforcement tab, make sure to account for tie wraps along this area as well. (For above example, you would need an additional 50 tie wraps) Lacing rope can also be used for center reinforcement tab attachment.
-
Installation Quick Tips
- Before installing windscreens, make sure the fence is well anchored and in good condition.
- For installation, we recommend using 120 lb UV protected tie wraps or “zip ties”. These lightweight, UV treated, self-locking plastic fasteners simplify and accelerate any windscreen installation. Alternatively, you may choose to secure some areas of the screens with 50 lb. tie raps or black lacing cord. Tie wraps should be used as they will break at a high wind threshold. If metal clips are used, they will not break in a high wind event causing your screens or hems to tear.
- Hang windscreens off the ground so there is a gap of chain link between the court surface and the fence screen. A standard tennis fence is 10 ft high; and our standard tennis fence screens are 9 ft high. We advise hanging the screen at the top of the fence, a foot off the ground. Alternately, the windscreen can be centered, leaving a 6 inch gap at the top and bottom. For other fences, you typically want to hang the screens with a 4 inch gap at the bottom of the fence. This allows for weed eating/mowing without damaging your screens.
- Make sure that you are hanging the screen with the right side facing out. The back side of our fence screens will have a white label stitched into the hem.
- Each of the tags on our fence screen panels will be labeled with the finished size. We recommend writing the location of where your windscreen panel is installed on the label with a permanent marker. When the screens are taken down for storage, this will allow for better organization upon re-installation.
- Windscreens should be hung so that air vents (if included), are near the top.
- Make sure that every grommet is attached to the fence with one tie wrap or rope.
- Tie Wraps will break so it’s a good idea to keep extra on hand. Replace any missing or broken tie wraps immediately. Failure to do so may lead to wind damage to the screens.
-
Step-by-Step Installation
- To start, line the top left corner of your screen up so it sits just below the bottom of the fence top rail. (If screens were ordered properly, there should be a gap between the bottom of the screen and bottom of the chain link fence)
- Attach the first corner grommet to the chain link fence with a tie wrap. Make sure the fence screen is facing with the correct side facing out and that air vents (if included) are at the top. For large panels, it’s more productive to have two people to efficiently install the windscreen.
- Work your way down the length of the screen attaching grommets to the fence with tie raps; At this point, only install a tie rap approximately every 3 ft to 5 ft. Make sure to follow along just below the bottom of the fence top rail ensuring that the top of your screen is in a straight horizontal line.
- As you move along attaching tie raps, make sure to keep the fence screen flat and taught to eliminate any bunching and wrinkles. At this point, don’t pull your tie wraps too tight. Over securing will create a ripple effect along the top and bottom of the fabric. Secure the tie wraps enough to hold the fence screen straight across the top while keeping the fabric taught. You don’t want to stretch the fabric, just keep the screen flat.
- Once you finish the top grommets, start securing tie raps along the bottom of the screen in the same manner as the top grommets. Once you determine the screen is straight, flat, and fits as it should, secure tie raps to each vertical side of the screen and finally, go back and secure the rest of the grommets you skipped in step 3.
- Once all grommets are attached, pull all tie wraps tight and adjust where needed to eliminate any wrinkles that may have occurred.
- If your fence screen is over 6 ft in height and has a center tab you will need to secure the center reinforcement tab to the fence with tie wraps or lacing cord. Securing the center of the fence screen will minimize whipping from the wind which can damage the sport screens. To do this, you will need to go along the back side of the fence and secure the center tab with zip ties or use lacing cord to weave in and out between the chain link and the grommets.
- If installing more than one panel, continue the same process but do not fasten one screen to the next.
- Once all tie wraps are pulled tight, cut off excess length for a clean finished look.
-
Care and Maintenance of Sport Screens
Cleaning – Simply hose off fence screens with water to remove any dust and dirt accumulation. This can be done as needed or when the court surface is routinely cleaned. The force of the water should remove any grit and particles that could damage the windscreen over time. Use water only – no chemicals or cleaners should be used.
Storage – To get the longest possible life out of your screens, we recommend removing screens and storing indoors during off season. Prior to storing, screens should be cleaned per above directions. Allow screens to completely dry prior to storing. Once dry, neatly fold the screens and store them indoors.
Repair – Replace any missing or broken tie wraps immediately. Failure to do so may lead to wind damage. Should the product ever get cut or torn, be sure to repair it immediately before further damage occurs. For small tears, clear adhesive tape may be used as a temporary fix. If tape does not hold, the screen may need replaced.
Longevity
- To achieve the best performance and longest life out of your Douglas Screens, here are a few tips and tricks.
- Order screens in smaller panel sizes of 30 – 40 feet per panel. Smaller screens take on less wind stress.
- Add reinforced air vents to any screens over 6 ft high and also to any screens that will be installed in a high wind area.
- Never use hog rings or metal clips for attachment. Tie wraps should be used as they will break at a high wind threshold. If metal clips are used – they will not break in a high wind event causing your screens or hems to tear.
- Replace tie wraps immediately once broken. If screens are not tightly secured to the fence they will whip against the fence causing shredding; this is not covered by any warranty in the industry.